Lamps 101
Most of the classes on Instructables teach common hands-on skills such as woodworking, knitting, photography. Lamps, on the other hand, stood out, so I had to give it a try!
Below is a photo of my first lamp. The vase was purchased at Value Village, and the rest of the components were acquired at Lowes.
Below is a photo of my first lamp. The vase was purchased at Value Village, and the rest of the components were acquired at Lowes.

Home hardware stores like Lowes often sell lamp kits, but I wanted to build everything from scratch. I'll step through some of the details below, but of course the class is infinitely better if you are genuinely interested in building your own lamp.
Materials Used
- Vase,
- 16 or 18AWG cord (2 wire is good enough, as we won't be wiring a ground),
- Socket (I chose one with a built-in switch),
- 2-prong plug,
- Nipple (long, hollow, threaded rod),
- Rubber stopper,
- 1 large washer,
- 1 nut for the nipple,
- 3 adapters for the nipple (I threaded them onto the nipple for aesthetics, but many other things can be used in their place),
- 1 lamp shade,
- 1 light bulb.
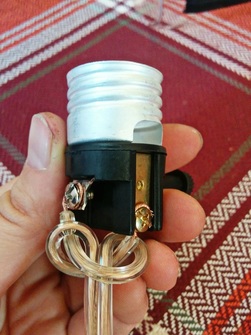
I started with some electrical work - wiring the socket and plug.
Wiring the Socket
- Cut the cord to your desired length (I chose 5 feet).
- Cut apart about 3" of wire on one end, separating the neutral and the hot wires.
- Tie the knot seen below, known as the Underwriters/Electrician's knot. This knot acts like a strain relief in case the wire is ever tugged on.
- Strip about 1" of wire, and twist the strands together.
- Using a Phillips screwdriver, loosen the terminals on the light bulb socket. Your wires will attach here.
- Shape the stripped wires into hooks.
- Attach the wires to their respective terminals. Usually, the Hot wire has smooth insulation - and it connects to the brass screw terminal on the socket, and the Neutral wire is slightly ribbed - and it connects to the silver-coloured terminal on the socket. Tighten the screws, clamping the wires underneath them.
- Ensure that you're happy with how things look - you don't want too much wire sticking out the end, or the wire fraying.
Now, traditionally, the wiring from the socket is pushed through the hollow nipple, into the base of the lamp, and then through a hole out the bottom. However, since I didn't intend to drill through the bottom of my vase, I let my wiring hang off the side of the socket. To accommodate this, I drilled a small hole in the socket's base to fit the wiring.
After threading the cord through there, I was ready to wire the plug at the other end of the cord.
After threading the cord through there, I was ready to wire the plug at the other end of the cord.
Wiring the Plug
- Take the plug apart, revealing the inside wiring. It should look very similar to the socket - screws ready to hold each wire in place.
- Split your hot and neutral wires apart about 1 1/2 inches from the end.
- Strip each wire about an inch, and twist the strands together.
- Shape the ends of your wires into hooks, and attach them to the screws. If you plug has one larger prong, that prong is connected to Neutral (remember that on your cord, smooth insulation = Hot, ribbed = Neutral).
- Some plugs have a strain relief built in. Mine was unfortunately very cheap, and I used glue to secure my wires at the end of the plug.
That's it for wiring! It's really important to check your wiring to make sure that you didn't make any mistakes. Use a multi-meter to ensure that there is no continuity between Hot & Neutral wires (and do this for various states of your switch, of course). I'll leave this to you - if you don't know what you're doing, please ask someone who does.
Next up - how do we attach the socket to our vase?
The bottom of a socket uses a 1/8-27 thread which mates with the nipple. Now we need to secure the other end of the nipple to the lamp somehow.
Attaching the nipple to my vase was slightly more difficult than I expected. Some lamp kits come with little pre-threaded rubber stoppers for turning bottles into lamps, but my vase had a slightly wider neck. But Lowes has everything, and I found a 1/2" rubber stopper and used it instead.
Attaching the Socket to the Vase
- Cut the nipple to length (or at least, roughly to length), Most lamps how a bit of 'neck' between the base and the shade.
- Drill a hole in your rubber stopper, wide enough to thread the nipple into it.
- Attach the nipple to your drill and thread it through the rubber stopper, leaving a half inch at one end.
- Attach a large washer & nut to one side (this is the side that will sit in the vase). Tighten securely.
- If needed - back the nipple up with the drill, such that the stopper sits flush with the washer & nut.
- Mechanically - you're done. The rubber stopper will sit inside the vase (I used some glue to stop it from shifting), and the socket will screw onto the top.
- I didn't like the look of the exposed thread of the nipple between the stopper and the socket, so I attached some adapters in between the two for purely aesthetic reasons. You're welcome to find anything you like, or leave it as it is.
Voila, you have something that will sit in your vase, and thread into your socket! The only things left are attaching the shade and inserting a light bulb.

Socket attachment, sans aesthetic additions.
Here's me working on my lamp,

And here's the finished product,
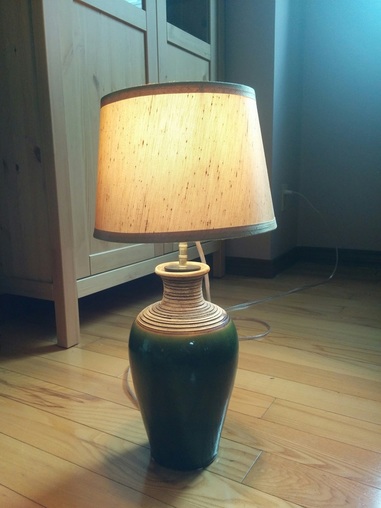
I thought that building a lamp was fun and quite easy. I sent the above photo to my mom and she asked where I purchased such a pretty lamp, so I am considering this project a success! There are still a few more places in my new home that need more lighting, so I'm confident that I'll be working on several more lamps in the weeks to come.
I hope you were inspired to make your own lamp. Don't forget to check out Instructables Classes.
Thanks for reading,
Julia
